This step by step woodworking project is about octagonal picnic table plans free. If you like to spend time in your garden with your friends and you need a large rustic table, we strongly suggest you to take these plans into account. You can build this table using just 2x4s and 2 1/2″ screws. Really simple design with a durable and sturdy structure. Take a look over the project and also check the rest of the related plans out, as there are many designs and styles you can choose from.
If you want to get a professional result, we strongly recommend you to plan every aspect of the project with great care. Work with attention and invest in the best quality materials you can afford, especially if you are going to place the picnic table in your garden. Take accurate measurements and adjust the size of the components with proper tools, before joining them together with screws and glue.
Building an octagon picnic table

Building an octagonal picnic table
Materials
- 1 – 8 pieces of 2×4 lumber – 35″ LEGS
- 2 – 1 piece of 2×4 lumber – 62”, 2 pieces – 30 1/4″, 4 pieces – 30″ TOP FRAME
- 3 – 8 pieces of 2×4 lumber – 26″, 8 pieces – 22 3/4″, 8 pieces – 19 1/2″, 8 pieces – 16 1/4″, 8 pieces – 12 3/4″, 8 pieces – 9 1/2″, 8 pieces – 6 1/4″, 8 pieces – 3 1/4″ TABLETOP
- 4 – 1 pieces of 2×4 lumber – 95”, 4 pieces – 46 1/2″, 2 pieces – 46 3/4″ SUPPORTS
- 5 – 8 pieces of 2×4 – 36 1/4” long, 8 pieces – 33″ SEAT
- 23 pieces of 2×4 lumber – 8 ft
- 3 pieces of 2×4 lumber – 10 ft
- 2 1/2″ screws
- wood stain
Tools
- Hammer, Tape measure, Carpentry square
- Miter saw, Drill machinery, Screwdriver, Sander, Router
- Safety Gloves, Safety Glasses, Respiratory Mask
Time
- One day
Octagon picnic table plans free
Assembling the frame
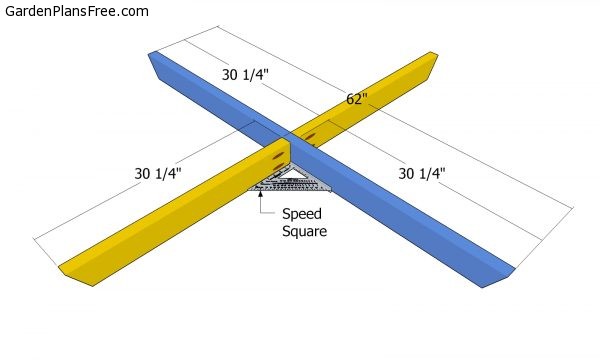
The first step of the project is to build the frame of the tabletop. As you can notice in the plans, we recommend you to make the frame out of 2×4 lumber, as to create a rigid structure. Take accurate measurements and cut the components at the right size before locking them together with 2 1/2″ screws and waterproof glue. Drill pocket holes at one end of the yellow components. Center them to the long support and make sure the corners are square (use a speed square).
Diagonal supports for tabletop
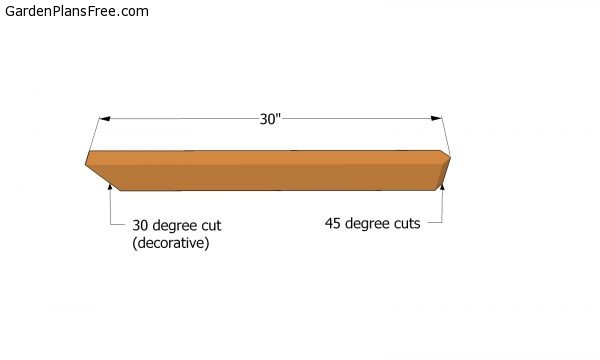
Use 2×4 lumber for the diagonal supports. Use a miter saw to make double 45 degree cuts to one end of the supports. Make a decorative cut to the other end, if you want.

Building the tabletop frame
Drill pocket holes at the tip of the diagonal supports and lock them into place with 2 1/2″ screws.

Building the tabletop
The next step of the project is to attach the slats to the frame of the tabletop. As you can easily notice in the image, you have to cut both ends of the 2×4 slats at about 67.5 degrees (set the miter at 22.5 degrees).
PRO TIP: Use a good miter saw when making the angle cuts, if you want to get consistent results. Leave about 1/2″ between the slats to enhance the water drainage. Start installing the boards from the center to the outside. Drill pilot holes and insert 2 1/2″ screws to lock them to the supports into place tightly.
Legs for the picnic table
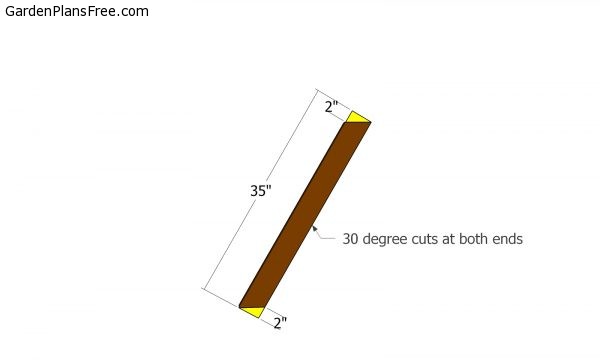
Use 2×4 lumber for the legs. Make the 30 degree cuts to both ends of the legs. After you make the cuts, the legs will have 60 degree ends.

Attaching the legs
Continue the woodworking project by attaching the 2×4 legs to the frame of the tabletop. Drill pilot holes and insert the 2 1/2″ screws. Make sure you align the components at both ends otherwise the ends result might not raise up to your expectations.

Seat frame
Next, build the frame for the seat of the picnic table. Cut the components from 2×4 lumber, at the dimensions shown in the diagram. Center the side components to the long support. Drill pocket holes at one end of the 46 3/4″ long supports. Insert 2 1/2″ screws to lock the supports into place and make sure the corners are square.
Seat diagonal frame
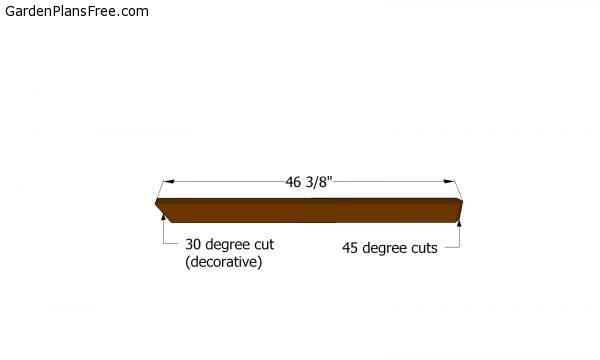
Use 2×4 lumber for the diagonal supports. Make double 45 degree cuts to the tip. Make a decorative cut to the opposite end.

Attaching the seat supports
Place a spirit level on top of the supports to check if they are perfectly horizontal. Lock the supports together tightly with 2 1/2″ screws, if you want to get a professional and durable result.

Picnic table frame
You can see the process from a different angle. As you can notice in the free octagonal picnic table plans, you should place the support about 13″ below the tabletop.

Installing the seat slats
One of the last steps of the woodworking project is to attach the slats to the seat supports. Cut both ends of the slats at 67.5 degrees (set the miter 22.5 degrees) and lock them into place with 2 1/2″ screws. Countersinking the head of the screws is highly recommended, if you aim for a professional result.

Octagon bench plans free
Last but not least, you should take care of the finishing touches. Therefore, we recommend you to check if the components are locked into place properly and if the frame is rigid. Make sure there are no protruding screws or sharp edges. Moreover, the components should be installed properly, making sure the gaps between the slats are even.
PRO TIP: Fill the holes with a good wood filler and smooth the surface with 120-grit sandpaper. Apply several coats of paint or stain over the components, in order to protect them from decay. Round the exposed edges with a router or a sandblock.

This diy project was about octagonal picnic table plans free. If you have enjoyed the free project, we recommend you to share it with your friends, by using the social media widgets.