If you care about your pet, you should definitely consider building a simple 3’x3′ dog house with a gable roof. Although the required constructions techniques are basic, one of the most difficult step of the project is choosing the right dog house plans free for your pet. As a general rule, you have to make sure your pet will have enough room to turn around easily and it is tall enough to sit. In addition, if you live in a cold area you should install insulation sheets between the wall studs.
After choosing the diy plans, you have to buy the most durable materials you could afford. Therefore, you need 2×4 lumber to build the floor frame and 2×2 lumber to make the main frame of the dog house. Build the exterior walls from 1/4 or 3/4” plywood, according to your budget and the average yearly temperature in your area. Select the materials with attention, checking if they are in a good condition.
DIY Dog House Plans

Diy dog house plans
Materials
- 1 – 4 pieces of 2×4 lumber – 33” long, 2 pieces of 2×4 lumber – 36” long JOISTS
- 2 – 1 piece of 3/4” plywood – 36 x 36” long FLOORING
- 3 – 4 pieces of 2×2 lumber – 33” long, 4 pieces of 2×2 lumber – 36” long PLATES
- 4 – 13 pieces of 2×2 lumber – 22” long, 1 piece – 10″ long STUDS
- 5 – 8 pieces of 2×2 lumber – 29″ long (one end cut at 45º), 1 piece – 36″ long RAFTERS
- 6 – 2 pieces of 1/4” – 3/4″ plywood – 27 x 36” long, 2 pieces of 27 3/4 x 36 3/4” long SIDING
- 7 – 4 pieces of 2×2 – 30 1/2” (both needs cut at 45º), 2 pieces of 1×3 lumber – 39 1/2″ long TRIMS
- 8 – 1 piece of 3/4” plywood – 30 1/2 x 40 1/4″ long, 1 piece – 31 x 40 1/4″ long ROOFING SHEETS
- 9 – 25 sq ft of tar paper, 25 sq ft of asphalt shingles SHINGLES
- 2 pieces of 2×4 lumber – 10 ft
- 8 pieces of 2×2 lumber – 12 ft
- 1 piece of 1×3 lumber – 8 ft
- 1 piece of 3/4″ plywood – 4’x8′
- 1 piece of 3/4″ plywood – 4’x4′
- 2 pieces of 1/4″ – 3/4″ plywood – 4’x8′
- 25 sq ft of tar paper, 25 sq ft of asphalt shingles
- 100 pieces 1 5/8″ screws
- 50 pieces of 2 1/2″ screws
- 50 pieces of 3 1/2″ screws
- wood glue, stain/paint
Tools
- Hammer, Tape measure, Carpentry square
- Miter saw, Drill machinery, Screwdriver, Sander, Router
- Safety Gloves, Safety Glasses, Respiratory Mask
Time
- One day
Dog House Plans Free

Building the floor
The first step of the project is to build the floor of the dog house. In order to build a durable frame, we recommend you to build the joists out of 2×4 lumber and to work on a level surface. Drill pilot holes trough the rim joists and drive in 3 1/2” galvanized screws into the regular joists. Cut a piece of 3/4” plywood and place it on top of the joists. Drive in 1 5/8″ screws to secure it into place.
PRO TIP: Check if the corners are right angled (with a carpentry square), before attaching the flooring.
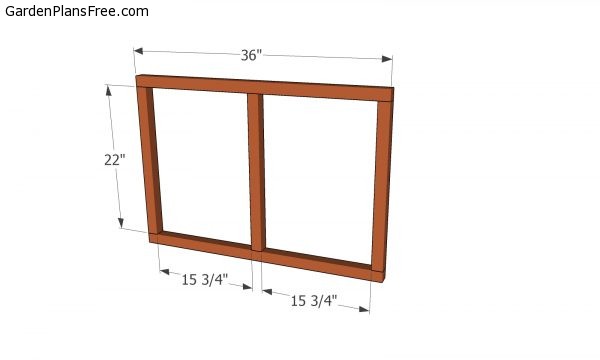
Side wall frame

Attaching the walls
The next step of the project is to build the wall frames and to fit them into place. Use the information from the plans to build the four frames from 2×2 lumber and 3 1/2″ screws. Work on a level surface, making sure the corners are square and the components are locked together tightly. As you can notice in the image, you need to frame the door opening, according to the size of your dog.
PRO TIP: Place the wall frames on the flooring, plumb them with a spirit level and drive in 3 1/2” galvanized screws into the joists. In addition, you should join the adjacent wall frames together, by driving in 2 1/2” wood screws.

Attaching the exterior siding
Afterwards, you have to install the exterior siding to the frames. After cutting the components, you should attach them to the walls and drive in 1 5/8” wood screws, every 4” along the studs. Leave about 2” from the ground to the bottom edges of the siding panels, to protect them against water damage.

Exterior siding plans
Build the exterior panels from 1/4” to 3/4” plywood, according to the weather conditions in your area. Mark the cut lines on the plywood sheets and make the cuts with a circular saw. In order to cut out the door entrance, we recommend you to drill a starting holes and to perform the cuts with a jigsaw.
PRO TIP: The blade of the saw has to go exactly over the cut lines, otherwise the wooden components might not fit together.

Installing the rafters
Building the roof of the dog house is a straight forward process, if you follow our building plans and take accurate measurements. As you can see in the image, you need to make the rafters from 2×2 lumber and cut one end at 45º. In addition, you could cut a small notch in the rafters to fit properly on the top plates. Use a carpentry square to mark the cut lines and get the job done with a saw.
PRO TIP: Fit the rafters into place, leaving about 10″ between them, drill pilot holes and insert 3” wood screws. Last but not least, install the top ridge and lock it into place with wood screws.

Attaching the trims
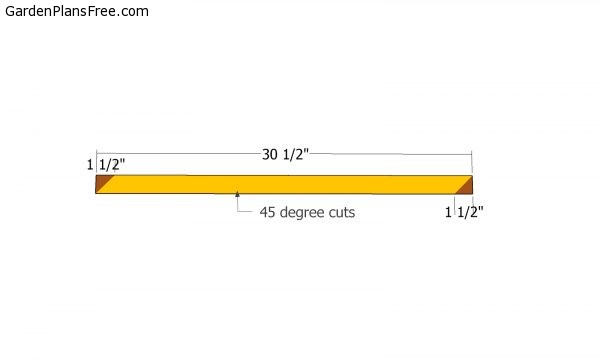
Trims
Next, you have to fit the trims into place. As you can easily notice in the image, you have to build the front and the back trims from 2×2 lumber (cut both ends of 30 1/2” pieces of lumber to 45º). Oppositely, build the side trims from 1×3 and lock them to the rafters with 1 5/8′ screws.

Installing the roofing sheets
Build the roofing sheets from 3/4” plywood, using our plans free. Make sure you take accurate measurements and use a circular saw with an appropriate blade (fine teeth), to prevent tearing the edges.
PRO TIP: Make sure the edges are flush with the trims and drive in 1 5/8″ screws trough the sheets into the rafters, every 4”. Since you are here, you might as well take a look over my other large dog house with porch plans.

Dog house plans free
Last but not least, there are a few finishing touches you should take care of. First of all, you need to cover the roofing surface with tar paper, making sure the strips overlap at least 2”. Afterwards, install asphalt shingles to make the dog house waterproof. Don’t forget to fit the starting course, before installing the rest of the tabs.
PRO TIP: Sand the wooden surfaces, if necessary, and vacuum the residues. Apply several coats of paint to the exterior of the dog house, to protect the wooden surfaces from decay.

This diy project was about dog house building plans. If you have enjoyed the free project, we recommend you to share it with your friends, by using the social media widgets.
2 comments
Looking forward to building.
Love this about to build it